Put in simple terms, kops is kubectl for kubernetes (k8s) clusters. The power of kubernetes is that it removes vendor lock-in, provides portability for your apps, databases incase decision gets made to different cloud vendor or if the cloud workflows need to go on-prem. Whatever the scenario may be, kubernetes give that freedom.
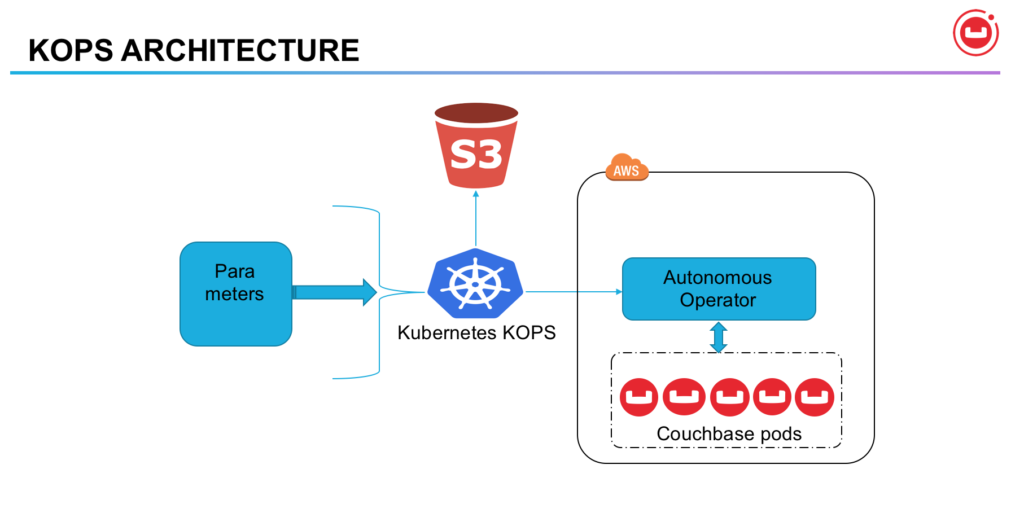
KOPS Architecture
In the spirit of doing full disclosure, It is easier to use tools provided by cloud vendors. Opensource tools like kops work equally well and are very efficient.
The Couchbase Autonomous Operator extends the Kubernetes API by creating a Custom Resource Definition(CRD) and registering a Couchbase specific controller (the Autonomous Operator) to manage Couchbase clusters.
For this blog we will be using AWS as IaaS and will demonstrate the kops usage, capabilities and Couchbase Autonomous Operator running Couchbase Cluster at scale.
What can KOPS do?
“kops helps you create, destroy, upgrade and maintain production-grade, highly available, Kubernetes clusters from the command line. AWS (Amazon Web Services) is currently officially supported, with GCE in beta support, and VMware vSphere in alpha, and other platforms planned.” [1]
Let’s get down to nitty gritty and see how it works?
- Install kops
- Create k8s cluster on AWS
- Configure k8s Dashboard
- Verify and validate k8s cluster
- Deploy Couchbase Autonomous Operator in K8s
- Deploy couchbase cluster
- Service resiliency
- Próximas etapas
Install KOPS
OSX From Homebrew
|
1 2 |
$ cerveja atualização $ cerveja instalar kops |
Linux
|
1 |
$ enrolar -LO https://github.com/kubernetes/kops/releases/download/$(curl -s https://api.github.com/repos/kubernetes/kops/releases/latest | grep tag_name | cut -d '"' -f 4)/kops-linux-amd64chmod +x kops-linux-amd64sudo mv kops-linux-amd64 /usr/local/bin/kops |
Create k8s cluster on AWS
Before we can use kops to create k8s cluster, we need to create IAM policies for kops and so that kops can provision the required resources needed to create k8s cluster. This is one time operation, needs to done only once
Prerequisites for kops
Install AWS CLI
For MacOS
$ pip3 instalar awscli --upgrade --user
For other platforms, clique aqui
NOTE: one-time op only
Enable AWS environment by running ‘aws configure’ and run the commands below
|
1 2 3 4 5 6 7 8 9 10 |
$ aws configurar # enter appropriate credentials with user with perms to create user/groups $ aws iam criar-grupo --grupo-nome kops $ aws iam attach-grupo-política --política-arn arn:aws:iam::aws:política/AmazonEC2FullAccess --grupo-nome kops $ aws iam attach-grupo-política --política-arn arn:aws:iam::aws:política/AmazonRoute53FullAccess --grupo-nome kops $ aws iam attach-grupo-política --política-arn arn:aws:iam::aws:política/AmazonS3FullAccess --grupo-nome kops $ aws iam attach-grupo-política --política-arn arn:aws:iam::aws:política/IAMFullAccess --grupo-nome kops $ aws iam attach-grupo-política --política-arn arn:aws:iam::aws:política/AmazonVPCFullAccess --grupo-nome kops $ aws iam criar-usuário --usuário-nome kops $ aws iam adicionar-usuário-para-grupo --usuário-nome kops --grupo-nome kops $ aws iam criar-acesso-chave --usuário-nome kops |
Create S3 bucket to store kops config/data
In my case, its named as rd-k8s-aws and for region us-west-1
|
1 2 3 |
$ aws s3api criar-balde --balde rd-k8s-aws --região nós-west-1 --criar-balde-configuration LocationConstraint=nós-west-1 $ aws s3api colocar-balde-versioning --balde rd-k8s-aws --versioning-configuration Status=Enabled |
Define env var’s for kops state store and cluster name
Pick any cluster name for your cluster, I have chosen rdc.k8s.local
|
1 2 3 |
$ exportação KOPS_STATE_STORE=s3://rd-k8s-aws $ exportação KOPS_CLUSTER_NAME=rdc.k8s.local |
Create k8s cluster with kops
Choose the AWS region, and instance size and node count for the k8s cluster.
|
1 |
$ kops criar agrupamento --nó-count=7 --nó-tamanho=m4.4xlarge --zonas=nós-west-2a --nome ${KOPS_CLUSTER_NAME} --estado=${KOPS_STATE_STORE} --sim |
OBSERVAÇÃO: takes around 5-8mins, good time to get coffee!
Sample output looks something like this
|
1 2 3 4 5 6 7 8 9 10 11 12 13 14 15 16 17 18 19 20 |
$ kops validate agrupamento Validating agrupamento rdc.k8s.local INSTANCE GROUPS NOME ROLE MACHINETYPE MIN MAX SUBNETS mestre-nós-west-1a Master m3.medium 1 1 nós-west-1a nós Nó m4.4xlarge 7 7 nós-west-1a NODE STATUS NOME ROLE PRONTO ip-172-20-42-242.us-west-1.compute.internal nó Verdadeiro ip-172-20-43-56.us-west-1.compute.internal nó Verdadeiro ip-172-20-44-17.us-west-1.compute.internal nó Verdadeiro ip-172-20-44-80.us-west-1.compute.internal nó Verdadeiro ip-172-20-48-254.us-west-1.compute.internal nó Verdadeiro ip-172-20-56-254.us-west-1.compute.internal nó Verdadeiro ip-172-20-60-79.us-west-1.compute.internal mestre Verdadeiro ip-172-20-63-146.us-west-1.compute.internal nó Verdadeiro Seu agrupamento rdc.k8s.local é pronto |
Get the nodes and validate the k8s cluster
|
1 2 3 |
$ kubectl obter nós --show-rótulos $ kubectl agrupamento-informações |
At this point kubectl context or k8s context should point to AWS k8s cluster
Configure k8s Dashboard
|
1 |
$ kubectl aplicar -f https://raw.githubusercontent.com/kubernetes/dashboard/master/src/deploy/recommended/kubernetes-dashboard.yaml |
|
1 2 |
$ kubectl criar conta de serviço dashboard -n padrão $ kubectl criar clusterrolebinding dashboard-administrador -n padrão --clusterrole=agrupamento-administrador --conta de serviço=padrão:dashboard |
On a different tab/terminal run the command below to proxy k8s api server onto local laptop
|
1 |
$ kubectl proxy |
Get the token to access the k8s dashboard
|
1 |
$ kubectl obter segredo $(kubectl obter conta de serviço dashboard -o jsonpath="{.secrets[0].name}") -o jsonpath="{.data.token}" | base64 --decode |
Choose option to use token and while grabbing token from above, skip % in the end.
Login to k8s dashboard at http://127.0.0.1:8001/ui [2]
Verify and validate k8s cluster
Validate the k8s cluster using command
|
1 |
$ kops validate agrupamento |
# check that number of nodes mentioned in the cluster create matches here
|
1 |
$ kubectl obter nós |
Deploy Couchbase Autonomous Operator in K8s
Now that we have deployed the k8s cluster, now it’s time to deploy the couchbase operator
First we deploy the operator, we need to enable RBAC for the operator, we need to create ClusterRole for the Couchbase Operator
|
1 |
$ kubectl criar -f https://raw.githubusercontent.com/ramdhakne/blogs/master/kops/cbyaml/cluster-role.yaml |
Observação: This role only needs to be created once.
After the ClusterRole is created, you need to create a ServiceAccount in the namespace where you are installing the Couchbase Operator, and then assign the ClusterRole to that ServiceAccount using a ClusterRoleBinding. In this guide we will use the padrão namespace to create the ServiceAccount.
|
1 2 3 |
$ kubectl criar conta de serviço couchbase-operador --espaço de nome padrão $ kubectl criar clusterrolebinding couchbase-operador --clusterrole couchbase-operador --conta de serviço padrão:couchbase-operador |
Deploy the couchbase operator
|
1 |
$ kubectl criar -f https://raw.githubusercontent.com/ramdhakne/blogs/master/kops/cbyaml/operator.yaml |
Running this command downloads the Couchbase Operator Docker image that is specified in the operator.yaml file and creates a implantação which manages a single instance of the Couchbase Operator. The Couchbase Operator uses a deployment so that it can restart if the pod it’s running in dies.
|
1 |
$ kubectl obter implantações -l aplicativo=couchbase-operador |
You should continue to poll the status of the Operator until your output looks similar to the following output:
|
1 2 |
NOME DESIRED ATUAL UP-PARA-DATA DISPONÍVEL IDADE couchbase-operador 1 1 1 1 47s |
When the couchbase operator is up and running it will look something like this
|
1 2 3 |
$ kubectl obter cápsulas NOME PRONTO STATUS RESTARTS IDADE couchbase-operador-7676b7cf47-99b5v 1/1 Em execução 0 1m |
We need to deploy secret for authenticating couchbase server GUI
|
1 |
$ kubectl criar -f https://raw.githubusercontent.com/ramdhakne/blogs/master/kops/cbyaml/secret.yaml |
Deploy the 10 node Couchbase cluster now
|
1 |
$ kubectl criar -f https://raw.githubusercontent.com/ramdhakne/blogs/master/kops/cbyaml/couchbase-cluster-multi.yaml |
Get the listing of the couchbase pods
|
1 2 3 4 5 6 7 8 9 10 11 12 13 |
$ kubectl obter cápsulas NOME PRONTO STATUS RESTARTS IDADE cb-exemplo-aws-0000 1/1 Em execução 0 7m cb-exemplo-aws-0001 1/1 Em execução 0 6m cb-exemplo-aws-0002 1/1 Em execução 0 5m cb-exemplo-aws-0003 1/1 Em execução 0 4m cb-exemplo-aws-0004 1/1 Em execução 0 3m cb-exemplo-aws-0005 1/1 Em execução 0 2m cb-exemplo-aws-0006 1/1 Em execução 0 2m cb-exemplo-aws-0007 1/1 Em execução 0 1m cb-exemplo-aws-0008 1/1 Em execução 0 1m cb-exemplo-aws-0009 1/1 Em execução 0 50s couchbase-operador-7676b7cf47-99b5v 1/1 Em execução 0 17m |
To access couchbase GUI, we will access at port 8091 and for that we can perform port forwarding like below
|
1 |
$ kubectl porto-avançar cb-exemplo-aws-0000 8091:8091 |
Couchbase server GUI can accessed at http://localhost:8091
Service resiliency
In order to show service resiliency, we can kill a pod, simulating losing a couchbase node.
|
1 |
$ kubectl excluir cápsula cb-exemplo-aws-0001 |
Biggest feature kubernetes gives us is service resiliency, if we lost a pod, then kubernetes checks for the cluster definition, and it understands that it need to have 3 pods, and it will spin up a new one, add to the cluster, and then perform rebalance on the cluster. Thus eliminating crucial administration task of monitoring the cluster for node failures, deciding what to do when it happens and then performing rebalance operation. All of this happens behind the cover, and applications will perform without any interruptions.
If we list pods again, then should see something like this
|
1 2 3 4 5 6 7 |
$ kubectl obter cápsulas --watch ... ... cb-exemplo-aws-0010 0/1 Pendente 0 0s cb-exemplo-aws-0010 0/1 Pendente 0 0s cb-exemplo-aws-0010 0/1 ContainerCreating 0 0s cb-exemplo-aws-0010 1/1 Em execução 0 1s |
Installing cbc-pillowfight to generate load KV load, gives us an idea what are the limits we can push on this cluster
From single app server, running pillowfight with following params
|
1 |
# cbc-pillowfight -U couchbase://localhost/kopsClusterBucket -u Administrator -P password -J -t 4 -I 10000 -p `hostname` |

KV performance with pillowfight
From single app server we are able to get ~34K Ops/Sec
Cranking up a notch, using other app server to run pillowfight, we can get more performance in the order of ~51k Ops/Sec

KV performance with pillowfight
Conclusão
What we learned here is using kops it becomes quite easy to deploy Couchbase clusters at scale and Autonomous operator provides benefits like service resiliency, auto-rebalance, automatic bucket creation, easy integration with CI/CD pipeline. yaml files can be standardized for Dev/QA/UAT and prod.
References:
[1] https://github.com/kubernetes/kops
[2] k8s dashboard troubleshooting